ATAGO
Hand Refractometers
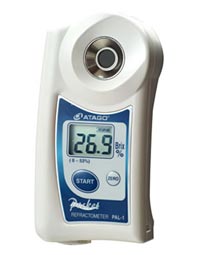
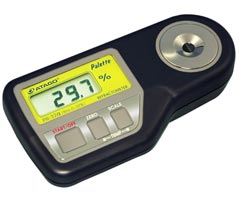
Digital refractometer PAL-1
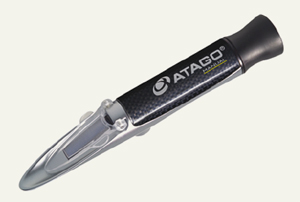
Hand refractometers types HR 10, 20 and 53
Digital refractometers PR-32a and PR-101a
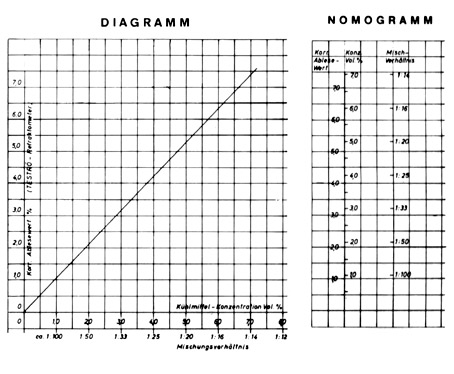
drawing up a diagram / determining the conversion factor "F"
TESTRÖ-Digital refractometer PAL-1
 |
The new digital refractometer PAL-1 encompasses all
advantages of usual digital and hand refractometers.
The PAL-1 is so small and compact that it fits into
every pocket. Measurements can be made very easily at any
place.
Because of the digital indicator, reading mistakes
are impossible. In addition, the PAL-1 is fully serviceable
also in bad light conditions.
The PAL-1 guarantees an optimal and quick
determination of the concentration of aqueous coolants.
The
PAL-1 provides an excellent price/performance ratio.
|
Features
and advantages
- Digital
indicating system as a guarantee for reliability
A
large liquid crystal indicator display displays a well legible
measuring result. Thus, reading mistakes or optically founded
display errors are impossible
- Corrosion
free sample measuring face of stainless steel
The
corrosion free sample measuring face of stainless steel (V2 A)
withstands all aggressive media and liquids. The measuring vat is
easy to clean and disposals of earlier measurements are easy to
remove.
- Compact
and handy design
The
light weight (100g) and the small dimensions make the digital
refractometer PAL-1 the ideal pocket device. So, you can carry out
the determination of concentrate anywhere at any time.
- Temperature
compensation
The
PAL – 1 can be used for measuring emulsions of high temperature, as
well.
- Modern
sensor technique enables independence of light
An
integrated quartz-iodine light with a certain light frequency and
illumination permeates the prism and the sample liquid. The emitted
light is measured by light-sensitive sensors and converted by the
computer into the measuring value. Because of this, optimal results
are also reached in ill lit rooms.
- Calibration
For
the zero adjustment just drop some water onto the prism and press
the start button. If an other value than 0,0% is indicated the zero
button has to be pressed. The zero adjustment should be made at the
beginning of the working day. The programming of the PAL-1 renders a
more frequent zero adjustment unnecessary.
- Scope
of supply
The
PAL-1 is delivered within a solid box that prevents it from damage.
Specified
technical data
Measuring
range: Brix 0-53%
Minimum
indication: Brix 0,1%
Measuring
accuracy : Brix +0,2%
Automatic
temperature compensation: between 10-60°C
Zero
adjustment: by pressing the zero-button after applying water onto the
prism
Measuring
time: 3 seconds
Dimensions:
109x55x31mm
Weight:
100g
TESTRÖ-Hand refractometers Types HR 10, 20 and 53
(MASTER-Series)

To
rapidly determine and control the concentration/mixing ratio
of aqueous coolants (emulsions and solutions).
|
|
The
TESTRÖ Hand Refractometers are optical measuring instruments that have
the following important advantages over the classic and so far mainly
used determining methods:· Suitable in particular for all aqueous
coolants, no matter what they are based on. Applicable also to other
industrial liquids, e.g. ones used for washing, pickling and
hardening. The media must not be that aggressive that they affect the
prism or the light sensor plate
- Determination
and checking of new and used emulsions and solutions can be done in a
few moments, directly at the machines, in the work shop or in the
laboratory.
- Considerably
more exact method of determination, tolerance +/- 0,1, respectively
0,2, with regard to the concentrate
- Clean
measuring method with minimal amounts without using separating
chemicals.
- Small
dimensions that make it possible to take the instrument to the factory
measuring instrument in pocket size, easy to handle

|
Measuring principle
The measuring method is based upon the principle of total
reflection of light beams that impinge at a certain angle on
the liquid that is to examine/measure. These light beams are
refracted as a function of the concentration. While measuring
there appears an easily readable light blue boundary on the
instruments scale. The concentration is determined by the
scale value and the respective concentrate factor. Instead of
a calculation from the reading value and the factor, an
evaluation can also be made by a nomo- or diagram. Hereby, an
immediate reading of the concentration, respectively the
mixing ratio is possible.
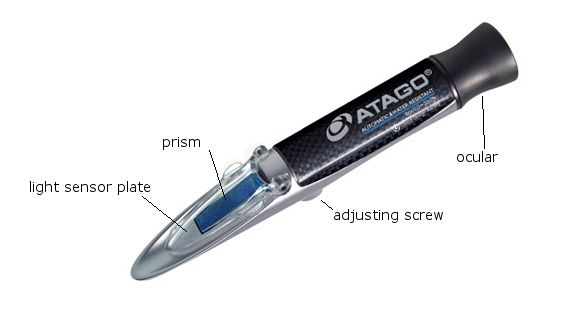
Description
The construction of the TESTRÖ-Handrefractometer is shown in
this picture:

| Technical data |
MASTER-10M
(HR 10)
|
MASTER-20M
(HR 20) |
MASTER-53M
(HR 53) |
| scale range |
0-10
|
0-20
|
0-53
|
| scale divisions |
0,1
|
0,1
|
0,2
|
| scale accuracy |
0,1
|
0,2
|
0,2
|
dimensions according to type: max. 200 mm
long, 35 mm Ø
weight including box: approx. 400 g |
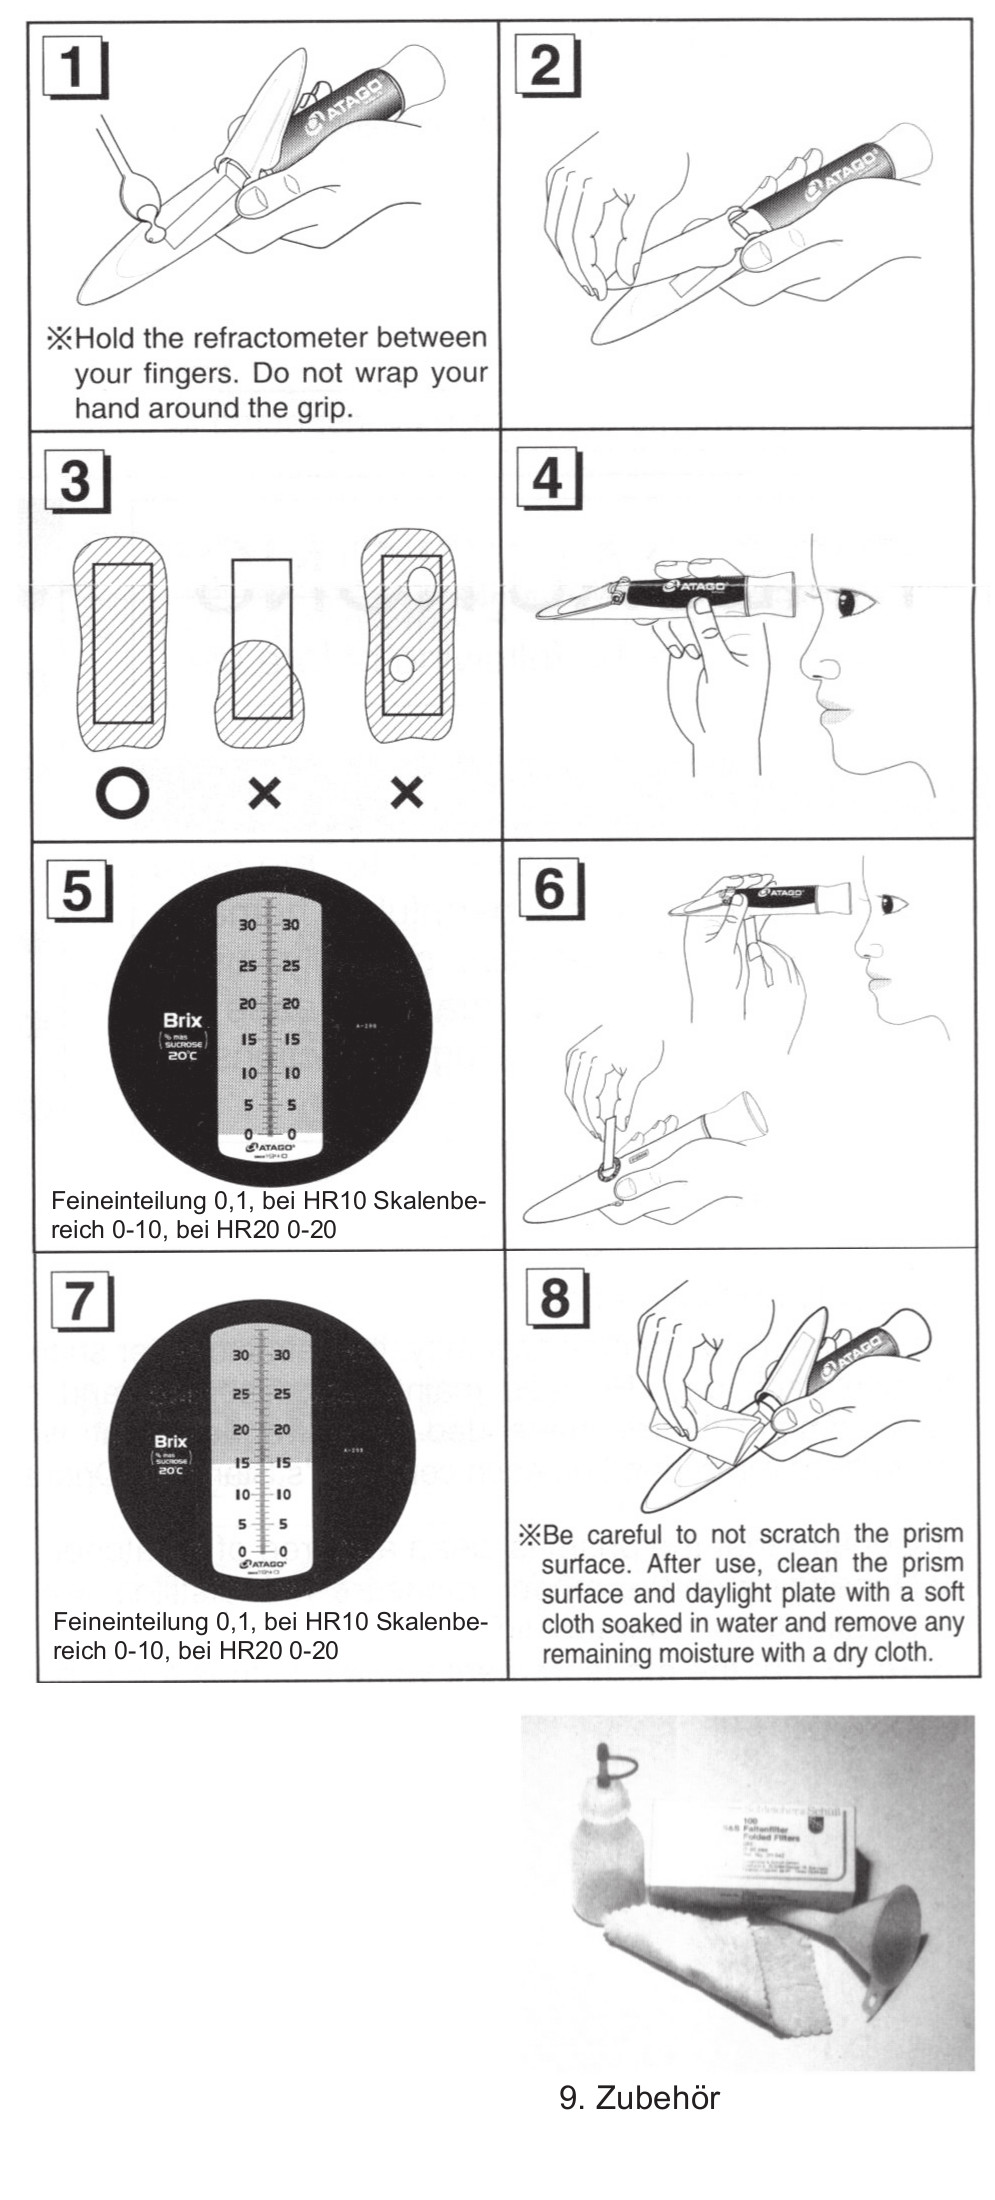
Measurement
- Put one or two drops of sample on the prism
(Figure-1)
- Close the Daylight plate gently (Figure-2)
- The sample must spread evenly over the prism
surface. Air bubbles should be eliminated (Figure-3)
- View the scale through the eyepiece. To focus,
turn the eyepiece in either direction until clear
(Figure-4)
- Read the measurement value where the boundary
line intersects the scale (Figure-7)
- Wipe the sample off with a wet tissue (Figure-8)
Calibration
This refractometer needs to be calibrated before being
used for the first time each day. Moreover, if the ambient
temperature changes during the day, it needs recalibrated.
- Put one or two drops of distilled water or tap
water (Figure-1)
- Close the Daylight plate gently (Figure-2)
- Distilled water or tap water or solution must
spread evenly over the prism surface. Air bubbles should
be eliminated (Figure-3)
- View the scale through the eyepiece. To focus,
turn the eyepiece in either direction until clear
(Figure-4)
- Confirm that the blue boundary line coincides
with "0%" on the scale (Figure-5)
- If the boundary line does not coincide with "0%",
turn the scale adjustment screw with a screwdriver until
it does (Figure-6)
Cleaning
and maintenance
The measuring instrument is to be kept dry and, if possible,
in its case. After use the prism and the light sensor plate
have to be cleaned with water and wiped dry. (Figure-8)
Parts of the accessory are intended for this procedure.
|

|
TESTRÖ-Digital refractometers PR-101a and PR-32a
|
For the optimal and quick determination and control
of the concentration / mixing ratio of aqueous lubricants
(emulsions and solutions) and other liquids.
|
|
Measuring
principle
The TESTRÖ Digital Refractometer PR 32a is based upon the principle of
refraction. It was not only developed in order to check the parts of
materials in an aqueous solution in percentage, but also to determine
the final reaction values and mixing ratios of chemical compounds. So,
virtually every concentration deviation of a mixture from the target
value can be determined quickly and exactly.
Characteristics
and advantages over the hand refractometers
In contrast to the hand refractometer the digital refractometer has the
following advantages:
- Prominent functions and quick measuring time
After years of development we can satisfy the customer's
demand for automatic measuring of concentrations. This
measuring method has been made possible because of a
unique refraction sensor. An integrated micro computer
operates the automatic temperature compensation. The
calculation takes place immediately and guarantees an
accurate measuring. A correction of the scale value by the
temperature coefficient is therefore not necessary.
- Digital indication: the new standard of
reliability
A large liquid crystal indicator displays a well legible
measuring result. Thus, reading mistakes or optical
founded display errors are impossible.
- corrosion free sample measuring face of
stainless steel
The corrosion free sample measuring face of
stainless steel (V2 A) withstands all aggressive media and
liquids. The measuring vat is easy to clean and disposals
of earlier measurements are easy to remove.
- Cast prism guarantees the measuring accuracy
A cast prism (contrastive to a ground prism) guarantees a
non distorted light passage and exact measuring results.
|
- compact and handy design
The light weight (295g) and the small dimensions make the
digital refractometer the ideal pocket device. So, you can
carry out the concentrate determinations everywhere at any
time.
- prevention of incorrect measuring
The integrated microprocessor checks if a calibration with
water has been made (zero adjustment). If the calibration
has been forgotten, the display shows "AAA". At the same
time the microprocessor detects if there is no more sample
liquid in the measuring vat or if the liquid exceeds the
measuring range of 32% Brix.
- Modern sensor technique enables independence
of light
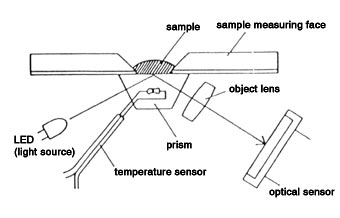
An integrated quartz light with a certain light frequency
and illumination (red light) permeates the prism and the
sample liquid. The emitted light is measured by light
sensitive sensors and converted by the computer into the
measuring value. Because of this, optimal results are also
reached in ill lit rooms.
|
|
|
Recfraction scheme of the PR 101a

Specified
technical data
| measuring range |
Brix 0-45% (PR-101a) Brix 0-32% (PR-32a) |
| minimum indication |
Brix 0,1% |
| measuring accuracy |
Brix ±0,1% |
| automatic temperature compensation |
+5-40°C |
| zero adjustment |
by pressing the button after applying water
onto the prism |
| measuring time |
3 seconds |
| sample volume |
>= 0,1 ml |
| dry cell battery |
006 P |
| dimensions |
170x90x40 mm |
| weight |
295 g |
A
short instruction for determining the concentration
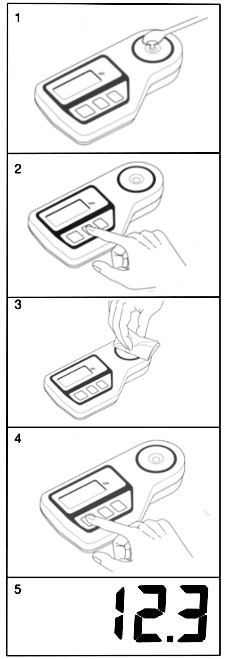
- Filter the liquid you wish to determine with the
accessory (delivered on request)
- Apply a few drops of tab water onto the prism
surface (zero adjustment of the PR - 101a) - picture 1.
- Press the calibration button for adjustment to
the surrounding temperature - picture 2.
- Remove the water with the cleansing tissue -
picture 3.
- Apply the emulsion or solution you wish to
determine onto the prism (picture 1)
- Having pressed the start button, the measuring
result appears on the display after three seconds. The
value is saved and displayed for five minutes - picture 4
and 5.
- After determining the concentration clean the
prism with water and a tissue (accessory) - picture 3.
Important
information: As long as the aqueous material shows the
factor 1, the displayed value is also =%. If not, the
conversion factor has to be determined, or alternately a
dia- or nomogram has to be drawn up (instruction available).
If you want to avoid both, please ask the supplyer of the
concentrate for details. An instruction for drawing up a
nomo- or diagram for determination of the factor -F- is
delivered with the order.
|
Instruction for drawing up a nomo- or diagram and for
determining the conversion factor "F" for determining the concentration by TESTRÖ-Hand
Refractometers HR 10,20,32
A)
Drawing up a nomo- or diagram

The
nomogram and the diagram respectively can be drawn up for every cooling
lubricant without difficulty. Just produce three emulsions or solutions
of exact volume concentration (water and concentrate should have a
temperature of 20°C) and determine, by multiple repetition, the scale
values for the three calibration concentrations. The average values are
drawn into a diagram (ordinates = scale value; abscissa = measured
concentration). In case of appropriate implementation the values lie on
a straight line. From this line the "real concentration value"
correlating to every scale value can be read. Thus, to every point on
the line there belongs a reading and a concentration value. By
juxtaposing these number pairs there ensues the nomogram for the
respective coolant.
Please
note that the refraction is highly dependent of temperature. Thus, all
measurements have to be carried out at the same temperature (normally
20°C). Otherwise an appropriate correction will be necessary.
B)
Determination of the conversion factor "F"
The
following methods are possible:
| a) |
The
conversion factor "F" is numerically identical with the specific
concentration value of the dia- or nomogram, that corresponds to
the refractometer scale value 1.0, and can therefore be deduced
from above mentioned documents. |
|
| b) |
In
general, the conversion factor "F" can also be determined from
the refractometer scale value of one single emulsion or solution
of known concentration by dividing the concentration value by
the scale value. |
|
|
example:
concentration (measured) 4.0
refractometer
scale value 5.0
conversion
factor "F": 4.0 / 5.0 = 0.8
comments:
the method according to b) is naturally less reliable.
|
|
C)
General Remark
Provided
that you do not want to draw up a dia- or nomogram (optional) or
determine the conversion factor "F" on your own, we recommend to ask
your distributor for the dia- or nomogram or for the factor of the in
question coolant.
In both cases it would be necessary that the determination and the
control of the concentrations / mixing ratios of the coolants ensues
with a TESTRÖ Hand Refractometer.
-
subject to alterations - production revision reserved -
